All In Recovery (Traditional)
by Wayne Horodowich
I recall when I started my sea kayaking career. Being self
taught at the beginning and then learning from books, I recall reading and
then trying the "All In" recovery. I have come to call this the
"Traditional All In Recovery", because I have learned so many other
options for dealing with an "All In" situation.
I asked Derek Hutchinson the history of this recovery and
he told me he figured this one out after hearing of a multiple capsize situation
involving a large number of boy scouts. He pondered how he would have gotten
the boys back in their kayaks with all of them in the water at the same time.
I have to admit, that I would probably use this recovery only
as a last resort. My reason being, this method promotes longer immersion time.
See USK Article, "Capsize Recovery Theory." Since one of my primary goals in any capsize is minimizing
exposure to the elements, I will try to get into my kayak as quickly as possible.
Since I carry a paddle float and pump, I would do a quick self recovery and
then go to help my partner, if they still needed assistance by the time I got
there. If they were following the same procedure as me, then we would both be out of the
water quickly. However, if you and your partner find yourself in the water at the same time
and neither of you have a pump, then the "All In" recovery becomes more practical.
Regardless of the reason, let's assume you and your partner find yourself in
the water at the same time. Once I know I have my paddle and my kayak, I check
to see where my partner is located. If I can see them in the water, I will try to ascertain
if they are OK and if they have their kayak and paddle.
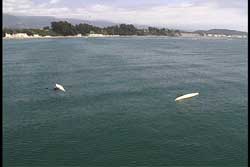 In the unlikely event we did not have a pump between
us, then we would have to pull our kayaks toward each other to begin the "All
In" recovery process. Just think of the amount of immersion time you will both endure just
trying to get the kayaks next to each other. Imagine trying to do this in rough seas and wind.
In the unlikely event we did not have a pump between
us, then we would have to pull our kayaks toward each other to begin the "All
In" recovery process. Just think of the amount of immersion time you will both endure just
trying to get the kayaks next to each other. Imagine trying to do this in rough seas and wind.
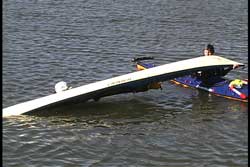
My standard procedure for pulling my kayak when I am in the water is grabbing the bow loop and doing a side stroke toward my destination. My paddle can be in the same hand as the bow loop (difficult with small hands.) Some choose to secure their paddle to their kayak before pulling the kayak. Whether you pull the kayak upright or upside down is up to you. It does move faster upright, but it may be harder to grab the loop if the bow sweeps up. If you didn't have adequate floatation, then leaving the kayaks overturned is the recommendation so you can keep the air trapped in the cockpit, thus reducing the chance of having your kayak sink when the air escapes when turning the kayak upright.
 Once we are next to each other, we take advantage of the platform
created by the capsized kayaks. Since we are doing this recovery technique because we do not have pumps, we need to drain the water from the boats. In order to do so, the paddlers in the water need a solid base of support so they can lift the bow of at least one kayak to let the water drain before they climb back in.
Once we are next to each other, we take advantage of the platform
created by the capsized kayaks. Since we are doing this recovery technique because we do not have pumps, we need to drain the water from the boats. In order to do so, the paddlers in the water need a solid base of support so they can lift the bow of at least one kayak to let the water drain before they climb back in.
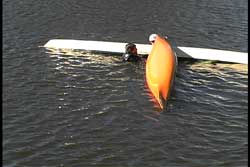
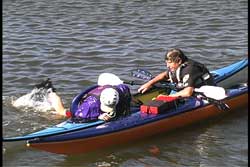
Set up in a T-position. Holding the cockpit coaming of the overturned
base kayak gives you the support you need to lift the bow of the kayak you wish
to drain. It also prevents the base kayak from rolling upright (which could
cause a flooded kayak to sink if it did not have bulkheads or floatation).
In this demo, we are draining the kayak with the orange hull
first. Since there is a back bulkhead we only need to lift the bow to drain
the necessary water. If there were no bulkheads, then we would have to pull
the orange kayak completely over the base kayak to drain the water from both
sides, using the seesaw method used in a TX recovery. See USK article, "TX Recovery."
During this recovery you will need yours hands free. So where
do you put your paddles? They can go in the cockpit of the base boat, use
your paddle leashes, cow tails on your PFD, deck slings or try to hold the paddle while you hold
the coaming.
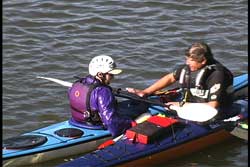
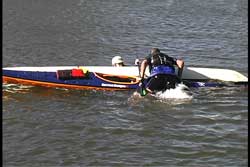 Once the water is drained out of the first kayak, turn it
upright and position it parallel to the overturned kayak. You can use your paddle(s)
as a bridge for support and a place to grab while you climb on to your back deck and re-enter
your kayak. I use the paddle bridge because it helps keep the kayaks together and minimizes the rolling action of the upright kayak. Many paddlers will find it difficult to reach across two kayaks to grab each other by the hand for help, so the paddle bridge is a good option.
Once the water is drained out of the first kayak, turn it
upright and position it parallel to the overturned kayak. You can use your paddle(s)
as a bridge for support and a place to grab while you climb on to your back deck and re-enter
your kayak. I use the paddle bridge because it helps keep the kayaks together and minimizes the rolling action of the upright kayak. Many paddlers will find it difficult to reach across two kayaks to grab each other by the hand for help, so the paddle bridge is a good option.
Once you are on your back deck, you need to slide back into your cockpit and turn your body upright. Using that paddle bridge throughout your re-entry process provides great support for your kayak and keeps the kayaks together.
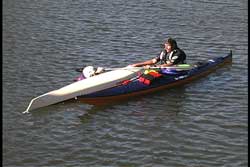 While you are getting into your cockpit, the overturned kayak next to you provides you with tremendous
support if you need it. Remember, you can use your paddle(s) as a bridge across
your lap for support as you attach your spray skirt. You can also use the bridge to keep the kayaks together while you are getting your spray skirt back on.
While you are getting into your cockpit, the overturned kayak next to you provides you with tremendous
support if you need it. Remember, you can use your paddle(s) as a bridge across
your lap for support as you attach your spray skirt. You can also use the bridge to keep the kayaks together while you are getting your spray skirt back on.
The person still in the water can hold the other end of the
paddle(s) to help support you and to maintain their contact with the kayaks.
Once the upright paddler gets their spray skirt on and collects their wits, they can proceed to help the paddler still in the water.
 When you are ready to assist the second paddler, still in the water, get your hands free (meaning stow the paddle(s))and then begin the process of draining the
water out of your partner's kayak. In this case we are showing a standard T-Recovery. See USK article, "T-Recovery."
When you are ready to assist the second paddler, still in the water, get your hands free (meaning stow the paddle(s))and then begin the process of draining the
water out of your partner's kayak. In this case we are showing a standard T-Recovery. See USK article, "T-Recovery."
As previously mentioned, the T-method of draining is only applicable
if there is a rear bulkhead. Otherwise you will need to perform a TX-Recovery as referenced above.
Lifting the bow assures you get the most water out of the cockpit as compared to lifting the stern.
 When the water is out of the cockpit, position and stabilize the kayaks so
your partner can re-enter their kayak.
When the water is out of the cockpit, position and stabilize the kayaks so
your partner can re-enter their kayak.
If you have used this "All In" method, then the last
paddler to enter their kayak will have the greatest immersion time. Deciding which paddler gets out of the water first is dependent upon many factors. Since the second paddler spends more time in the water, your immersion clothing will be one of those factors. Your ability to help the second paddler and your ability to climb on as the first recoveree are also factors. You and your partner will need to access this at the time. However, I suggest you practice both positions during your training sessions.
Regardless of who exits the water last, you may have to spend some time getting that paddler warm. That is why I stress dressing for immersion.
 After both paddlers are back in their kayak, briefly discuss
why you both went over. The existing conditions have probably not gotten any better,
so it would be wise to discuss if there are any strategies that can keep you both upright. At the very least, you may choose to paddler closer together in case there is
another capsize.
After both paddlers are back in their kayak, briefly discuss
why you both went over. The existing conditions have probably not gotten any better,
so it would be wise to discuss if there are any strategies that can keep you both upright. At the very least, you may choose to paddler closer together in case there is
another capsize.
Remember, don't let go of each other's kayak until you both
clearly state you are ready to continue. Since there is so much that needs to get covered during your kayak class and practicing techniques move quickly, many paddlers come away from the class with the feeling they need to separate from their partner immediately after a recovery. I suggest you stay rafted up until both are physically and mentally ready to continue. See USK article, "Seaworthy."
There is one good point to mention in favor of paddling as soon as possible after the paddlers are back into their kayaks. Paddling generates heat to help warm you if you are feeling chilled.
Again, dressing properly for immersion gives you many more options and making "time in the water" not such an important factor.
If there were three of you paddling and all of you capsized,
then the third paddler would just hang on the bow of one of the kayaks until
the second paddler was in their kayak. Then the two could help the third.
Imagine the immersion time for the third paddler. Of course if the "All
In" situation were four or more, then you would pair up and any odd
number would join one of the pairs.
During the filming of our Capsize Recoveries
& Rescue Procedures video, we filmed a race between some different
solo recoveries and the traditional "All In" recovery. There was
no doubt to anyone, that those who did their solo recoveries had less immersion time than the two who tried the traditional "All In" recovery. There are also many variations of the "All In" recovery concept. Rather than list them here, I challenge you to find other "All In" variations without doing solo recoveries that end with the cockpits drained.
If you are properly prepared you will probably never use this
recovery. However, if you and your partner find yourself in the water and
have no pumps, then this is one of the recoveries to put into your bag of tricks.
USK Home
Page
Pictures seen above were taken from the USK Video "Capsize
Recoveries & Rescue Procedures"
© Copyright USK