H-I Recovery
By Wayne Horodowich
In the early days of modern day sea kayaking or should I say in the years prior to bulkheaded kayaks, it took a lot of energy and strength to drain water from a flooded kayak. The process often involved more than one person in the draining procedure. One of the methods used for draining a flooded kayak was the HI-Recovery.
As with many of the draining methods the HI got it's name by the configuration of the kayaks during the draining process. In this case there were two kayaks used to drain one. This recovery also depended on the strength of the paddle shafts. I wonder if the new light weight paddles made today would be able to hold the weight of a flooded sea kayak without bulkheads? I mention this because you shouldn't rush out and try this recovery method with your new ultra light paddle. Remember, this technique was developed when the strength and weight of the paddles were greater. Many of the earlier methods utilized paddle bridges. I personally like using paddle bridges in many of my recovery and supporting techniques, because I know my paddle can take it.
Like the TX-Recovery the HI uses the teeter-totter (seesaw) method of draining water, because of the lack of bulkheads. The HI-Recovery also takes some orchestration with your paddling partner. You have two paddlers that have to work in unison and move quickly, because the third person is still in the water. It does take some practice to do this recovery efficiently, because two kayakers must work together.
![]()
The "H" is formed by the two kayaks and the paddles bridged between them. The paddle bridge keeps the two kayaks together and provides support to the upright kayakers. The "I" is the overturned kayak.
When the two kayakers paddle up to the swamped kayak they head for the bow and position themselves on either side of the bow. Both kayakers should be facing the same way. Then they place their paddles between their kayaks to form a bridge. The paddles are resting over their cockpits close to their bodies.
I do want to re-emphasize the point about two paddlers needing to work together for this method. Immersion time of the paddler in the water increase as you bring more paddlers into the equation to do the recovery. This skill needs to be practiced amongst you and your partners to make the orchestration run smoothly.
![]()
While holding the paddles in position with their outside hands, the kayakers get the support they need to use their inside hands to grab the bow and lift it onto the paddle shafts. The paddle bridge is the key to the support needed for this recovery.
When the bow is lifted the first half of the kayak will drain. Once the bow is over the shafts and the water is out of the front half the kayak is then pulled up onto the shafts until the flooded kayak can balance on the paddle shafts.
While this is easily said I can tell you from experience that this is not easy to do. The weight of a flooded kayak without bulkheads is significant. In addition, you are trying to drag the top deck of your kayak over the paddle shafts. Imagine if you have your spare paddle, a compass, recovery equipment and other stuff on your deck. Your top deck is not a smooth surface.
![]()
The second half of the kayak is drained by performing the teeter-totter method using the paddle shafts as the pivot point. I would be using all three paddles so their is more strength for the support. The third paddle belongs to the swimmer. He or she handed it to you when you arrived at their bow.
The reason you lift the bow is two fold. First, if there is a rudder it is better to avoid it during recovery operations. Second, if there is a back bulkhead then just lifting the bow will be sufficient and the teeter-totter will not be necessary. If there is going to be only one bulkhead in a kayak the very high probability is it will be a rear bulkhead behind the seat.
![]()
Once the kayak is drained it is turned upright and slid back into the water so it can be stabilized to allow the person in the water to begin their re-entry into their kayak. The person in the water can help with the seesaw action.
If you have deck lines, it makes this recovery technique doable. If you do not have deck lines this method is a nightmare to perform. Imagine trying to pull up a heavy, slippery kayak on a cold day with nothing to grab.
While the draining is going on the paddler in the water can be hanging on either bow so they can be seen by those doing the draining. If the kayak is difficult to move or lift, the paddler in the water can help as directed. By staying near one of the bows the paddler in the water will be near the position for re-entry when the time comes.
![]()
The center kayak is stabilized by the two outside ones and the paddle bridge is still used for support. Again, it is best to use all three paddles for the bridge, especially when the flooded kayak is on them.
Having two paddlers to hold the kayak provides a few more options during the re-entry phase. Remember, extra people mean extra hands. The kayak in the middle is incredibly stable when it is being supported from to sides.
This three kayak raft also provides great stability for the two kayakers that performed the skill.
![]()
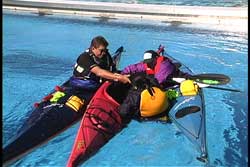
One of the re-entry methods commonly used during the HI-Recovery is the feet first method. The paddler in the water gets between the kayaks and places one arm on their kayak and one arm on the other.
When ready, the paddler in the water leans their head back in order to easily lift their feet into their cockpit. Once the feet are in the cockpit the kayaker presses down on their hands as they arch their back in order to slide their back side and body over their seat back and into their cockpit.
I have seen some paddlers excel in doing this re-entry method. On the flip side, I have seen a lot of struggling with this re-entry technique. I look like a wounded seal when trying to do this one. I think my longer body has something to do with it, aside from not being good at arching my back. The only way to see if you can do it is to try it.
If they cannot get in by themselves the kayaker on the opposite side can lend a hand to help the re-entering paddler get back into their kayak.
Caution-DO NOT use this re-entry method if you have bad shoulders or previous injuries to your shoulders. I once saw a dislocation with a paddler who had a chronic shoulder injury when they pressed down to arch their back.
Also, keep in mind that boats bang together on rough seas so be careful when in between kayaks in such conditions. Wearing a helmet in rough conditions is an excellent idea.
As in all recovery methods do not let go of the kayak until the paddler who just re-entered tells you to do so. After a capsize it is not uncommon for the wet paddler to need some composure time. See USK article, "Seaworthy."
In the early days where strength was needed to lift fully flooded kayaks this was a viable option. I would learn it and practice it to have it in your bag of tricks should you come upon a kayak without bulkheads. However, in these times with two bulkheaded kayaks the HI-Recovery is not really needed. A simple T-Recovery will be more efficient, because it only involves one person for the draining (less time needed to orchestrate) and a teeter-totter is not needed if there is a back bulkhead in the capsized kayak.
Don't forget my comment about using lightweight paddles for this recovery. As I have often said, there are some techniques that are equipment specific. Just because a skill is in a book it doesn't mean it can be done with every kayak or by every paddler.
Pictures seen above were taken from the USK Video "Capsize Recoveries & Rescue Procedures"
© Copyright USK