High Brace and Low Brace Blade Mechanics
By Wayne Horodowich
Using a brace is an essential part of kayaking if you wish to stay upright. A well executed brace will keep you from capsizing even in the roughest of conditions. There are many different ways to brace. The purpose of this article is to discuss the basic paddle mechanics of the high and low brace. I will also compare the basic high and low brace.
An important point to make about bracing is the mistake in belief that the paddle is what brings you back upright. The paddle stops the capsize movement and then provides support while you move your kayak and body to get your center of gravity back over your kayak. This article will not be focusing on the body and boat movements needed to successfully do a brace. One must first learn the basic blade mechanics before attempting a brace. As I often write, this will be covered in a future article.
When I started teaching kayaking in the early 1980's, a common belief in defining a high and low brace was determined by the height of the blade when bracing. The height of the blade has nothing to do with defining a high or low brace. As you will read, the main difference of the high and low brace is which face of the blade you use and the relation of the blade to your elbows. It is not really determined by the height of the blade. Depending on the conditions I could easily do a low brace with my blade higher than some of the high braces I have done.
 Before we look at the actual blade mechanics of bracing, we need to discuss proper hand position. I feel not enough emphasis is given to proper hand position when bracing and performing strokes. If your hands are in the correct position then correct blade manipulation can occur. One of the challenges to correct hand position is the feather angle of your paddle. Incorrect hand position usually occurs when one braces on one side of their kayak and then has to brace on the other side. Regardless of the feather angle, we can only brace on one side at a time so we will look at the hand position for the side doing the brace.
In my illustrations I am using a 90 degree feathered paddle. Again, your feather angle doesn't make a difference as long as you have the correct hand position for the blade that is bracing. Here is a good time to review one of my basic tenets when I teach strokes, "The hand closest to the working blade controls that blade."
 Since I am going to perform my first stroke on my right side, I have the knuckles of my right hand even with the knife edge of the right blade. This is my basic paddling position for my right side. This position allows me to perform all the strokes I need to use on my right side. I do not need to change my hand position for any strokes on my right side. This is a very important point. All too often paddlers move their hands around the shaft when performing strokes on the same side. As you will see, this hand position remains the same when performing the high or low brace. As always, a relaxed grip is important for good strokes and for reducing the chance of getting overuse injuries.
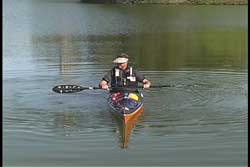
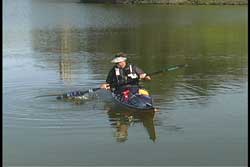
The opposite hand provides support for the paddle shaft so the working end can perform as needed. In my basic paddling position I am ready to take a forward stroke with the power face of the blade facing the stern of my kayak. When you look at my illustration you are seeing the back face of the blade. For those paddling with a curved blade (concave blade) the concaved face is the power face.
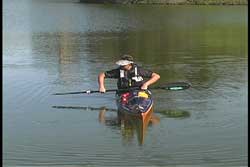
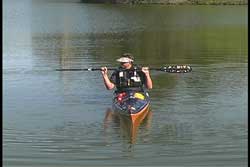 Once you have the correct hand position you can now move into the high brace position. I am demonstrating the correct high brace position, which has the power face of the blade facing the water. If the water was a mirror you would see the reflection of the power face of the blade. My hand knuckles are still even with the knife edge of the blade. My elbows are pointing down and the bracing blade is about level with my shoulders.
Once you are in the correct high brace position, the power face of the your blade will provide the support you need to keep from capsizing and/or the support you in oreder to right yourself. Whether you choose to do a slap brace or a high sculling brace the hand and blade position are the same. In this instance, I will be showing the typical slap brace. I personally prefer a sculling brace because it provides endless support as long as I am sculling my blade. See USK article "Sculling". Even though a slap brace only gives momentary support it can still provide enough support if done correctly. It is also easier to discuss the mechanics by reveiwing the slap brace because we don't have to add the explanation of moving your blade in a sculling motion.
As with all braces, it is important to NOT lead with your head when trying to bring your body upright. It is much more efficient to try to bring the boat back under your center of gravity to right yourself. As in rolling, your head should come up last.
 The support you get from a slap brace is momentary. The more weight you put on the blade (over time) the more the blade will sink. There is a point where the blade is no longer providing support. The deeper the blade goes underwater the less support you will get from the blade. Therefore, the rest of your body movements in righting the kayak must be quick, coordinated and deliberate.
Keep in mind, the flatter the blade is to the surface of the water the greater the support. Therefore, if you lift your non-bracing hand too high it will raise the angle of the shaft and you can end up spearing the water instead of bracing. Your non-bracing hand is there for static support. Do not push it up too high during the bracing process.
Another aspect to notice is how far my kayak is leaning when I do a high brace. This point will become relevant when I compare the high and low brace later in the article.
 Another important element of learning a brace is learning how to recover your blade after it has gone underwater. The novice paddler will try to pull the bracing blade toward the surface while it is still in the brace position. The resistance of the blade on the water can cause a capsize if the paddler pulls too hard. The paddler actually pulls their body toward the blade because of the resistance of the blade under the water.
Before a paddler puts weight on a brace they should learn how to recover the blade so the blade comes out of the water easily, without resistance. You want to turn your blade on knife edge before you pull it up towards the surface. Since there are two edges to the blade it is important to lead with the correct edge. Most paddlers will automatically use the correct edge because trying to use the wrong one is very difficult for most given the range of motion of your wrist joint. I tell my students to lead with the top of their wrist when putting the blade on edge. This means, you lift your wrist and let you hand drop below the wrist. It is the same movement as if you were going to look at your watch if the face of the watch were on top of your wrist. Once the blade is on edge you can pull it to the surface without being pulled under by a flat blade. Another way of explaining it is, you are leading with the correct edge if your power face is facing the stern when you recover from a high brace. Your paddle will be in the correct postion to take a forward stroke if you wanted to do so.
I cannot emphasize this point enough, during this entire bracing movement and recovery movement your hand position has remained constant on the shaft. The correct hand position will allow all the manipulation of the blade without changing the hand position on the paddle shaft.
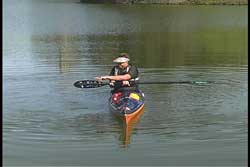
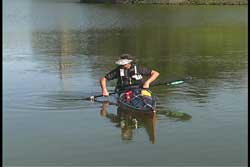
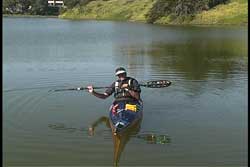
 The low brace is executed when the paddler uses the back side of the blade with the hands in correct paddling position, with those hands lower than the elbow. An exercise I like to do with my students is to start with a high brace and then tell them to move into a low brace position. All that needs to be done is move your hands from above the elbows to below your elbows and then present the back of the blade flat to the water.
As a side note, I prefer to keep my elbow up which provides me with more driving force (which translates to more support) when I brace. As before, the hand closest to the blade doing the bracing is the hand controlling the blade.
 As with the high brace, you need to regain your balance over your kayak while the blade provides support. If you rest on the blade too long, you may go under as the blade sinks.
Here is a good time to do a comparison to the high brace. Notice how much my kayak is leaning with the low brace compared to the earlier example with the high brace. Look closely at the pictures showing my blade in the water for the high vs the low brace. See how much more lean there is to my kayak with the high brace. In a low brace, your blade makes contact with the water sooner because it is closer to the water. This illustrates a very important point. If you are in a position to use either a high or low brace, the low brace will provide support faster and thus stopping the leaning action of your kayak sooner. This means less work is needed to right yourself. It has been my experience that the low brace is very UNDER utilized.
Another reason to start with a low brace (if you have the option) is the possibility of going to a high brace as a back up. I recall starting to capsize during a whitewater river outing. When I realized my low brace wasn't working I very quickly recovered my blade and tried to do a high brace as my head was nearing the water. I am proud to say it worked. I think one of the reasons my high brace worked and my low brace didn't is because I didn't practice my low brace enough. As with most paddlers I practiced my high brace more often. There is something about a high brace that feels more secure to me. I honestly admit that is my brace of choice, especially in the surf. However, over the years I have put more time into the low brace which has provided that support sooner than a high brace. I also need to mention, trying to do a low brace and moving into a high brace during a capsize was doable for me when I was younger and more agile. I cannot remember the last time I tried it as an exercise. The key to success was learning how to do a quick blade recovery. A vital safety point is NOT to over extend your shoulder when trying for a high brace. We will discuss this point later in the article.
 Recovering the blade from a low brace is the opposite action from the high brace recovery. If you want the correct edge coming up from the low brace lead with your knuckles and fingers. This time the knuckles come up before the wrist. If you are looking at your blade you will never see the back of the blade if you brace and recover correctly.
As before, practice your blade recoveries before you actually put weight on the brace. I have my students go through the high and low brace movements at least a dozen times before we even try using the blade for support. Learning the movements are vital before you can count on the blade. In addition, learning the correct body movements must be done before attempting a brace.
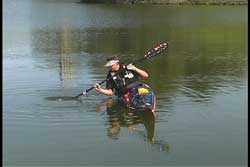
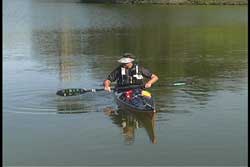
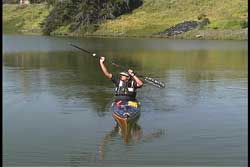 Part of my teaching style is to demonstrate common mistakes I see, especially ones that can lead to an injury. Here is an exaggerated high brace which is leaving me (the paddler) in a position where I can dislocate my shoulder, if I were to try to brace. When you look at this picture you are probably saying, "I don't reach that high to brace."
You may not realize it, but you may be reaching into this position when you are almost over and you reach out to do a high brace. Injuries occur to the shoulder in the high brace position when the elbow gets near or above the level of the shoulder, especially when you straighten out the elbow. See USK article, "Shoulder Safety" for more in depth information.
As a side note, if you are thinking you would reach that high to brace into a big wave, you are WRONG! Your high brace height should not have the blade higher than your shoulders and your elbows must be pointing down and by or near your side. The blade enters the wave wherever the blade height is in order to keep your shoulder safe. Keep in mind you will also be leaning and edging which will also lower the height of the blade in relation to the wave.
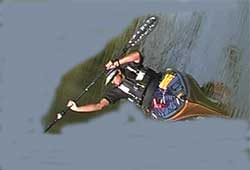 Here is the same picture as above after a quick rotation, crop, blow up and a little coloring added through photoshop. I did not change my body or paddle position. When you look at this picture now, it is easy to see how you can get into an INCORRECT position when you capsize and REACH out for a high brace. The key is NOT to reach for your high brace. You do not want to straighten out your elbow joint.
The paddlers who reach out for a brace like this are the ones that are almost capsized and they try that last ditch attempt to get their paddle out there for a brace. I often recommend taking the capsize and then roll up instead of reaching for that brace where you could possibly injure your shoulder.
 If you are going to reach out for a high brace I recommend not reaching any farther than I am showing in this last picture. My opposite elbow (non bracing side) is down and next to my side. The bracing side elbow is still pointing down. I try NOT to reach any farther than this, regardless of the circumstance. If I reach out any farther I know I am at risk.
Earlier I mentioned the time I was able to switch from a failed low brace to a high brace. When I reached up for that high brace I was still in a good position with respect to the relationship of my elbow to my shoulder. However, this is an example of how one can reach too far in the excitement of the moment when you are almost underwater. Therefore I recommend to fully understand and practice proper brace mechanics. My students spend a lot of time moving their paddles into different brace positions before they ever try bracing.
I keep mentioning proper hand position. One of the main reasons we lose proper hand position is when we have to change which blade we are using. During my last bracing clinic, I spent thirty minutes discussing the proper hand placement and all the different ways we can get into the correct hand position. I will not even attempt to describe it in writing. This is a topic that is best taught in a hands on class. The key points to remember when performing a brace is to have your knuckles even with the correct knife edge and the hand closest to the working blade controls that blade. A good drill to practice is switching from side to side, alternating randomly from high and low braces. This drill is just to see if you are getting the correct hand and paddle placement. You are not actually bracing on the blades. Don't forget to practice sinking your blades so you can master blade recovery. When you feel like you have good hand and blade placement, do the drills with your eyes closed.
When comparing the high and low brace, I also need to include how each brace can flow into what I call combination strokes. Given the position of a high brace, it flows naturally into draw strokes and forward strokes. If I am side surfing a wave to shore, I can do a high sculling brace and add a supportive forward stroke to move my kayak forward while I am moving sideways toward shore. The addition of my forward stroke can help me avoid and obstacle.
On the other hand I can use a low brace and transition easily into reverse strokes, rear paddle rudders and low brace turns. The ability to combine strokes is based upon the proper hand position I keep mentioning. I suggest you try moving into different strokes when you are practicing proper blade mechanics of high and low bracing. Before you can do any stroke properly you need to practice the correct blade positions and movements. You want your body to develop proper neuromuscular pathways.
You can see why I started with just focusing on proper blade mechanics. There is a lot of information above. I suggest you check and see if you are holding the paddle correctly when you brace. See if your hand position changes when you move from a high brace to a low brace on the same side. Then check to see if you maintain correct hand position when you alternate your braces from your right and left sides.
I will close by acknowledging most of us have a favorite bracing side, commonly referred to as our on-side and off-side. As I learned sports throughout my life I freely admit I would practice more often the skills I did best rather than the skills that were awkward. Heck, I didn't want to feel like a klutz any more than I do being so tall and tripping while I chew gum. I have learned over many years of capsizing, that my on-side skills don't help me very much when I start capsizing on my off-side. If you can, try to get equally good on both sides. The hair you will keep dry will be your own.
Pictures seen above were taken from the award winning USK Video "ABC'S Of The Surf Zone "
USK Home
Page
© Copyright USK