Using Ranges (Transits)
By Wayne Horodowich
The use of ranges is one of the best navigational tools I have learned to depend on when I need to keep a strait course, fix a location or to see how my kayak is moving with respect to the surrounding area. Ranges make use of two fixed objects as navigation aids. Ranges are also known as "Transits" in some other countries. I know when I traveled in the UK transits was the common term used.
In order to use a range you need to have two fixed objects in the distance, with one object closer than the other to your location. In addition, the farther object should be higher than the closer object in order to maximize your use of that range. Any two fixed objects can be used as a range, but there are specifically built structures to be used as a range in areas where a straight course needs to be maintained to avoid obstacles. As kayakers, due to our shallow draft vessels, we may not need the use of these deep water channels so certain ranges may not be useful to us. There are times I used ranges that indicated deep water channels as the place to avoid due to the heavier boat traffic. I specifically stayed in the shallows so I wouldn't have to engage in the law of tonnage battles.
Let's look at some examples of ranges and how they could be useful to you as a paddler or in your daily life.

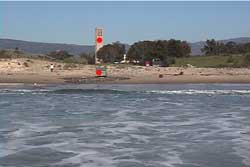
Typically we gather up our group in a staging area to land through the surf. Since I usually land first and then direct the rest of the group through the surf, I want the group in a fixed location and not stretched along the shore. On this particular day we were dealing with a long shore current that wanted to move the staging area to the left as we looked at the beach from the water. Knowing this I picked a range from two fixed objects on the shore that could be easily seen from the water. The two objects were a concrete bunker on the beach and the campus bell tower in the distance. As long as the group kept these two objects lined-up they would be in a straight line to the landing spot.
I have added red dots on each of the objects for your viewing pleasure. As long as the red dots are lined-up vertically you will have a straight line to the landing spot.
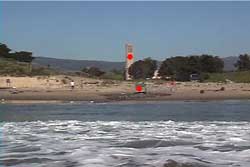
If you were to get lazy and not paddle against the long shore current you would start moving along the shoreline. In this next picture you see that the two red dots are no longer aligned vertically. In this case the top red dot on the tower is to the left of the lower red dot that is on the bunker from the water view. Since the farther object of the range moved to the left it means the group has moved to the left.
If they wanted to get back to the original spot, the group would have to move against the current until the two dots were aligned vertically. If the group wants to stay in that spot they need to match the speed of the current to hold their fixed position.
This is one of the ways in which I use ranges. If I want to hold a fixed position for a landing I try to find a range on shore. Once I find a range I can tell if there is a current or a wind moving my kayak. The speed at which I move from my fixed point gives me an idea of how hard I will have to work to hold my position.
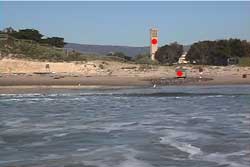
In this example the group has moved even farther down the beach. If you want to know the direction in which you are moving look at the farther object of the range. You will be moving in the same direction as the rear object appears to be moving with respect to the closer object. Of course neither of these objects are moving because we defined them as fixed objects. Therefore, they appear to be moving with respect to one another when you are the one actually moving.
That is why you do not pick moving objects for ranges, such as sail boats, cargo ships, etc. Nor should you pick the beachcomber on shore as your fixed point. I often use trees, but you must be careful that you can pick a distinctive tree amongst the forest. As you use ranges more often you will see how many different objects can work for you.
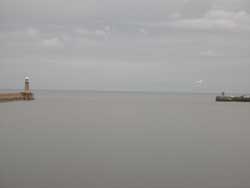
When Hadley & I visited our friend Derek in England in October of 2007, he took us around much of the North Umbria coast. Derek lives just a five minute walk from the mouth of the Tyne river. The Tyne river is major commercial waterway. Tyne mouth is partially protected by two long rock & concrete jetties as seen here. Once one heads out passed the jetties they are in the North Sea. Since conditions can get very rough on the North Sea navigational aids have been constructed for sailors.
Derek shared numerous stories of the many ship wrecks and attempted rescues that have taken place at the mouth of the Tyne. As we stood on shore he pointed to one spot and rattled off the details. Then he pointed to another location and spouted more historical accounts. Needless to say, this harbor entrance can be very dangerous during storms.
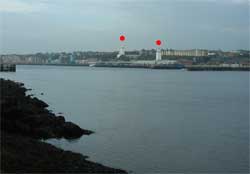
As we look up the river Tyne you can see two red dots that I have added to the photograph. I placed these dots on the two towers that were built specifically as a transit (since we are in England I will refer to them as a transit instead of a range). These two towers were lighted. My location is about half way between Tyne mouth and the two towers.
If you were on the North Sea and wanted to get safely into the harbor you would line up the two towers vertically. Once they were aligned, you could come right into the harbor knowing you were in the recommended shipping lane. Since they are lighted they also give you the direction at night as long as the lights are aligned.
Most of the ranges that are built specifically for navigation are lighted. I cannot tell you the percentage, but if you examine your nautical charts they should be indicated on the chart. I have been in places where the ranges were not lit. There are two along the Na Pali coast of Kauai that indicate where the army corps of engineers created a channel through the reef. As long as you lined them up you would have a clear path to shore.
Before I show other examples of ranges, I want to discuss how I use them other than taking a straight line to shore or to determine how I am moving. I have often used ranges to remember a specific spot on the water. It is not uncommon for someone to lose a piece of equipment during a class. If the class in a location where the water isn't too deep and there are multiple ranges around, you can fix your location by taking two different ranges. Since it is so easy to float along the water surface due to wind, current or momentum, it is nice if you can fix a point. If a student immediately tells me that they have dropped a sinking object overboard I quickly look around and pick out two different ranges that are 60 to 120 degrees apart. The best angle is a 90 degree difference in the ranges. By having two ranges I have created two lines that will intersect over the fixed location. If you search in that fixed location you have a good chance of finding the lost object. These two ranges are the basis of triangulation. In triangulation you get a fixed position with three lines.
In essence a range creates an imaginary straight line over the landscape or waterscape. I have used ranges when hiking, skiing and doing compass runs. Once you have that imaginary line you can fix your position along that line in different ways, which is a topic for another article. If I can pick out a range that is on my heading I don't have to look at my compass anymore. When doing compass runs on the water it is rare to use a range for long distance since there are usually wind and current factors that make the range useless. Ranges are usually short distance when on water, especially if you are human powered. I have also lined up the tips of two islands and used them for a range. As a side note, I have used ranges in my back yard to locate sprinkler heads that were overgrown.
Once you start using ranges it is amazing how often you will see them and fine day to day uses for them. Before I finish this article I want to share a great experience Hadley and I had when traveling along the English coast. I think anyone who enjoys being on water will appreciate this little add-on to the article.
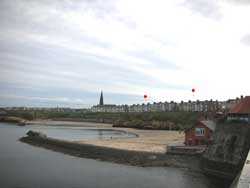
Here is a small protected cove just north of the river Tyne. This cove is the location of the Cullercoats Life Boat Station. The building in the lower right potion of the picture is the life boat house. This is one of the many life boat stations dotted along the shores of the UK. Since the UK is an island, surrounded by some very rough seas, ocean rescue is very important. Many of these life boat stations are manned by volunteers. These volunteers have saved countless lives over the past 100+ years.
If you look in the middle of the picture you will see two red dots, that I have added, that are above the two towers that are the transit for the entrance to Cullercoats harbor. This is not a different example of a transit. The reason I am showing this is because of how these aids to navigation are integrated right into the residential area. England has a rich nautical history and aids to navigation are essential for saving lives.
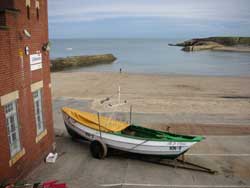
Here is one of the wooden lifeboats that have been used. It is parked on the side of the boat house. In the background you can see the opening to Cullercoats harbor. In this Life Boat House there is a hard shell zodiac life boat. We were given a private tour by one of the volunteers who happened to be there when we went by.
As we walked through the boat house we saw pictures of past crews and pictures of the life boats in action. We were awed by the old wooden panels that listed the rescues. One had rescues dating back to 1853. Back in those days they had a group of hearty volunteers that would row out through horrendous surf to rescue those in need. There are also monuments the life boats crews that were lost trying to safe others.
The present crew of volunteers are just as hearty, but they do have more technology and safety gear to save more lives. The hard shelled zodiac, self righting, dual engine life boat was a thrill to see. It also comes with a tractor that can take it down to the beach when the surf is crashing over the jetty walls.
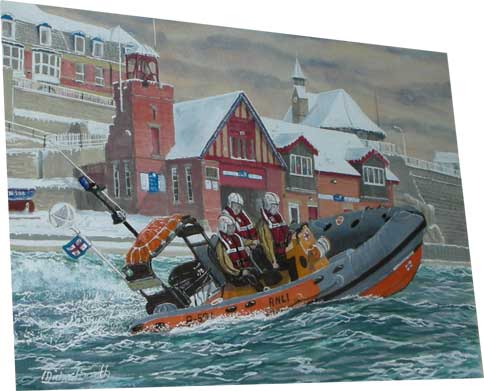
This is a picture I took of an painting that was hanging on the wall of the Cullercoats Life Boat House. If I could read the artist's name he or she would be given full credit.
This picture depicts the crew going out on a winter's day for a rescue with the boat house in the background. The crew now wears full survival suits, crash helmets, rescue PFD's and carry a list of other essential gear.
We have to say that this impromptu tour of this Life Boat House and meeting two of the crew was one of the highlights of our trip. In our own way we are saying thank you to the volunteers past, present and future who risk their lives to save others regardless of where they are stationed. As a frequent user of our seas, and knowing how difficult conditions can get, I feel there is never enough recognition paid to those who do the rescues.
This is a small thank you from the kayaking community.
Some pictures seen above were taken from the USK's Award Winning Video " ABC's Of The Surf Zone " while other were taken on our trip to the United Kingdom.
Updated 3/15/2009
© Copyright USK