Cleopatra's Needle & Curl Recovery
By Wayne Horodowich
Once upon a time before bulkheads and proper floatation, if you capsized in your kayak and had to do a wet exit you would be lucky if your kayak didn't sink. Sometimes there would be enough air in the bow or stern to cause the kayak to float pointing straight up. I asked Derek Hutchinson why this was called Cleopatra's Needle. He replied "with the kayak's bow pointing to the sky just above the surface of the water, it reminded him of the obelisk (named Cleopatra's Needle) that stands on the River Thames Embankment in London. Also, with all the water in the kayak it probably weighs just as much."
Now a days some of you may think this cannot happen. Don't be fooled, there are still some who kayak without proper floatation, no bulkheads, leaky bulkheads, leaky hatch covers or get holes in their compartments. What ever the reason, here is a method to get the water out of your kayak, but I can tell you it is not easy. With the increase in the number of skin-on-frame kayaks (SOF) this skill is even more important to hone. Even though SOF kayakers know to put float bags in their kayaks, I have seen some without them and more often float bags inside, but NOT inflated.
If the water is in the forward or aft compartments and you have bulkheads it becomes even more difficult to manage this recovery. This is definitely an assisted recovery in every sense of the word. It may even take more than one to help.
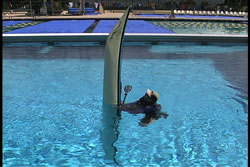
Let me introduce you to Cleopatra's Needle. When you paddle a kayak without bulkheads with little or no floatation bags, the kayak will fill with water after you wet exit. If you don't lose the kayak altogether then this is a likely result.
You need to keep the kayak upright until help arrives. This position holds the air in the kayak so keep it this way. It also makes a very noticable marker if you are at water level, such as another paddler of kayak in the area.

If the kayak is not too far underwater, hold the cockpit coaming with your hand or your foot if need be. Having deck lines also gives you something to grab on the outside of the kayak.
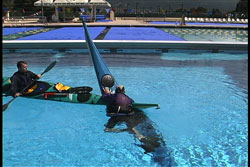
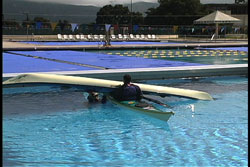
When help arrives grab the bow of the assisting kayak to use as an platform. While holding the coaming of the swamped kayak in your hand get yourself over the front of the assisting kayak.
By lying over the assisting kayak you will have a very stable platform that will provide the leverage needed to turn the flooded kayak parallel to the surface. Keep in mind that the remaining air can escape once the kayak is level with the surface. Clipping a tow rope to the grab loop or deck line of the swamped kayak is a good insurance policy.
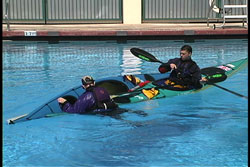
Once the kayak is level with the surface begin rolling the kayak so water can begin pouring out. You will use the curl method (just like doing the arm curl in a gym) to rotate the kayak by grabbing the coaming and pulling your arms towards your face as you keep the assisting kayak under your armpits. Remember, you are not trying to lift the kayak or the water. You are rotating the kayak to let the water spill out. The curl gets a significant amount of the water out and more air into the kayak so you can proceed to the next step.
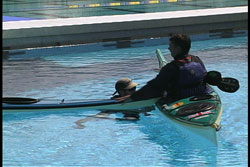
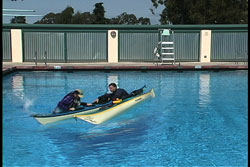
Once there is enough air in the kayak so it floats level on the surface your partner should move to the T-position so they can do a TX recovery. If you have two partners you could also do a double TX or an HI recovery.
The kayak will still be very heavy at this point so the paddler in the water needs to help get the kayak on the assisting kayak(s).
How you decide to break the cockpit seal and/or get the capsized kayak on the assisting kayak is up to you. There are many variations of the T-Recovery. Use the one that best fits your needs and conditions.
Since this kayak had water fore and aft the TX drain method was necessary. I can tell you from personal experience that I had to use all my strength to do a TX recovery when I saved a kayak without bulkheads. To add insult to injury that same kayak did NOT have deck lines.
After the water is out then stabilize the kayak so your partner can climb back in so you can be on your way.
After your partner is back in their kayak and if your partner was paddling without proper floatation and/or bulkheads, smack them in the head for being so stupid. Then tell them to smack you for paddling with them. In this day and age there is no excuse for this happening unless the flooding is due to a hole on the outside of the compartment from a collision with a rock or other solid object.
If you are victim to water getting into the front or rear compartments (past your bulkheads) then you will have to adapt this recovery. Once the water is in a front or rear hatch the only way to get the water out is opening the hatch cover. If the kayak is still parallel to the surface you may be able to hand pump the water out. If that kayak does a Cleo's Needle then you can use the curl method holding the cockpit coaming and the hatch rim.
Remember, to keep a hold of the hatch cover if you take it off. If you ever loose a hatch cover you can use duck tape (from your well supplied repair kit) and do the on-water kayak repair technique to give you a platform to cover the open hatch and fix the hole from a stable platform.
You should be inspecting your hatch seals and bulkhead seals at least once a year. If not, then smack yourself in the head. (All this stuff is well known so the smack(s) in the head are for those who like to learn the hard way.)
If you have a sea kayak without bulkheads, tow it out and have a Cleopatra's Needle Recovery Party with your paddling partners. Keep that tow rope on it so the kayak does not become a reef. Also, remember to dress for immersion. You may be in the water longer than you may think trying to do this recovery technique.
Pictures seen above were taken from the USK Video "Capsize Recoveries & Rescue Procedures"
© Copyright USK