Eskimo Paddle Recovery
By Wayne Horodowich
The Eskimo paddle recovery is a variation of the Eskimo
bow recovery (See USK article, "Eskimo Bow Recovery"). Instead of grabbing the bow of your partner's kayak you
are using a paddle bridge that is spanning across the bottom of your kayak (the one
capsized) and the deck of your partner's kayak. It is used when the two kayaks
are parallel to each other, rather than perpendicular (the Eskimo bow recovery).
The movements needed for the Eskimo Paddle Recovery are the
basis for rolling, the re-enter and roll and the re-enter and paddle float
roll. Learning and practicing this skill not only reduces your overall immersion
time, it can help you increase your hang time and begin to develop the skills
just mentioned.
 When you capsize and your partner is near enough to assist
you (assuming they know this recovery method) this is what to do. Lean forward as
close to the front deck as possible. Reach both hands into the air, one on
each side of your kayak. Your paddle can stay between your arm and your kayak.
When you capsize and your partner is near enough to assist
you (assuming they know this recovery method) this is what to do. Lean forward as
close to the front deck as possible. Reach both hands into the air, one on
each side of your kayak. Your paddle can stay between your arm and your kayak.
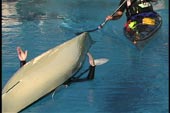
When you first go over, bang on the bottom of your kayak to
get your partner's attention. Then keep your hands up in the air moving them
forward and backwards along the side of your kayak. Be sure to keep your hands
off of the kayak to prevent your hands from getting pinned and smashed by the approaching
kayak.
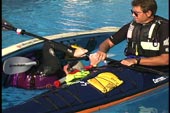
 As the assisting paddler gets to the bow or stern of the overturned
kayak, they span their paddle over the overturned kayak's hull and their own
deck. It is important the paddle is over both kayaks if you wish to stay upright
as the assisting paddler. I usually put one blade of my paddle over my lap
with my hand on the throat of my paddle. This allows me to have more of my
paddle over my partner's hull.
As the assisting paddler gets to the bow or stern of the overturned
kayak, they span their paddle over the overturned kayak's hull and their own
deck. It is important the paddle is over both kayaks if you wish to stay upright
as the assisting paddler. I usually put one blade of my paddle over my lap
with my hand on the throat of my paddle. This allows me to have more of my
paddle over my partner's hull.
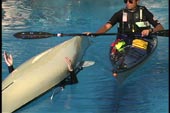
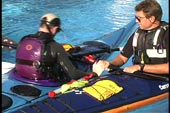
 As I slide toward the middle of the capsized kayak and my
partner's waving hand, I grab my partner's wrist and direct their hand onto
my paddle shaft. I avoid grabbing my partner's hand, because I don't want them to grab
me and pull me over. That is why I have my paddle spanning both kayaks. It
is my safety net in case my partner tries to pull on me or my kayak. Remember,
an overturned kayak with proper floatation provides plenty of support. Don't
be afraid to lay over it for balance.
As I slide toward the middle of the capsized kayak and my
partner's waving hand, I grab my partner's wrist and direct their hand onto
my paddle shaft. I avoid grabbing my partner's hand, because I don't want them to grab
me and pull me over. That is why I have my paddle spanning both kayaks. It
is my safety net in case my partner tries to pull on me or my kayak. Remember,
an overturned kayak with proper floatation provides plenty of support. Don't
be afraid to lay over it for balance.
 When upside down, you can easily get confused as to the direction
from which your partner is approaching. That is why you keep both hands up
and move them. You also don't know if you will get a bow in your hand or if
your partner will grab your wrist and place it on the paddle shaft. Therefore,
try to remain relaxed until you know which method is being used.
When upside down, you can easily get confused as to the direction
from which your partner is approaching. That is why you keep both hands up
and move them. You also don't know if you will get a bow in your hand or if
your partner will grab your wrist and place it on the paddle shaft. Therefore,
try to remain relaxed until you know which method is being used.
If you feel
human flesh don't grab and pull. Allow your hand to be directed. If you feel
a kayak in your hand check to see if it is one of the ends of the kayak before
you right yourself. If you try to pull on a kayak when it is parallel to you,
it is easy to capsize it if your partner doesn't have the paddle bridge in
place.
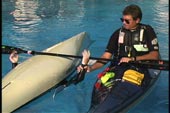
 Once the paddle is in your hand you will begin to pull yourself
up. When in reach, you place your opposite hand onto the paddle shaft. When
both hands are on the paddle, roll yourself up. The kayak is rolling up under
the paddle which is bridged over it.
Once the paddle is in your hand you will begin to pull yourself
up. When in reach, you place your opposite hand onto the paddle shaft. When
both hands are on the paddle, roll yourself up. The kayak is rolling up under
the paddle which is bridged over it.
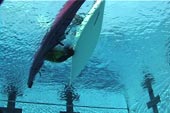
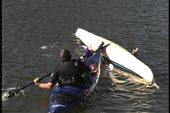
It is important to keep yourself close to the assisting kayak
as you roll up. If you get too much distance between the parallel kayaks you
run the risk of the end of the paddle coming off of the overturned kayak.
If this occurs you will not have the leverage to right yourself and the assisting
paddler will probably end up in the water too. Roll up close to the assisting
kayak while watching out not to bang your head.
 Remember to use your leg and trunk muscles to right your kayak
before bringing your head up. Once upright, you can look
for your paddle which should be nearby if you started with the paddle parallel
to your kayak floating between your arm and kayak.
Remember to use your leg and trunk muscles to right your kayak
before bringing your head up. Once upright, you can look
for your paddle which should be nearby if you started with the paddle parallel
to your kayak floating between your arm and kayak.
This recovery technique gets the paddler upright without having
to wet exit. Again, the overall immersion time is much less with
this recovery method as compared to one involving a wet exit, but you need to be able to hold your breath and stay in your cockpit (while upside down) until help arrives.
 When I approach an overturned kayaker who is signaling for
an Eskimo recovery, I try to come in at a 45 degree angle. I aim for their
hands and try to place my bow in their hand. If I miss, I will end up parallel
to the kayak and have the back-up option of using the Eskimo paddle recovery.
When I approach an overturned kayaker who is signaling for
an Eskimo recovery, I try to come in at a 45 degree angle. I aim for their
hands and try to place my bow in their hand. If I miss, I will end up parallel
to the kayak and have the back-up option of using the Eskimo paddle recovery.
When paddling with others on a trip we are usually all going the same way, so our kayaks are already parallel. This is why I like this method of the Eskimo Recovery. It is one that is more realistic to use when paddling together. Think about it, how often do you tour with kayaks perpendicular to one another?
When you are upside down, your submersion time is dependent upon how long it takes your
partner to get to you. Therefore your partner needs to practice their sprint
and and emergency stopping skills. A reliable supportive stopping stroke will add stability when stopping. (See USK article "Supportive
Reverse Sweep Stroke") You and your partner
should practice the assisting role so you can perfect your aim.
If you did run out of air before your partner arrives, you
can increase your immersion time by coming up for a quick breath and then go back down to continue to hang. Pushing down with both
hands on one side can give you the lift you need to get that breath. If you
do try for that extra breath while waiting, be ready to protect you face and
head from the oncoming kayak.
Again, I found this recovery method a great way to practice
my bracing and rolling. My partner would set up close by and come to get me
if I missed a brace or couldn't roll.
Of course this method is only as good as your ability to hold
your breath. The more relaxed you are the longer you will be able to stay
down. The colder the water the faster you will want to wet exit. We all know
how that ice cream headache feels. Trust me when I say this gets easier with
practice.
A caution about light weight paddles. This technique as with
any others using a paddle bridge can snap a paddle shaft if too much force
is placed on the shaft. The closer you roll up to the parallel kayak the less
force on the paddle. Having a good hip snap puts even less strain on the paddle
bridge.
When you practice this skill try it in the following order.
Start with the hip snaps. Then go under using the paddle bridge for support.
Next, let go off the paddle when under and let your partner guide your hand
onto the paddle. Once comfortable with the skill have your partner try it
ten feet away from your hand. Over time this recovery method will be another
one in you arsenal of recoveries.
USK Home
Page
Pictures seen above were taken from the USK Video "Capsize
Recoveries & Rescue Procedures"
© Copyright USK