Wet Re-entry With An Eskimo Bow Assist
By Wayne Horodowich
This recovery is an excellent example of using components from two traditional recovery techniques and combining them to create a new one. A wet re-entry is commonly used with a roll or a paddle float roll. The bow assist is commonly used for those who remain in their kayak after capsizing. However, if you put them together you end up with a recovery technique that may be easier for those who have difficulty climbing onto a back deck for re-entry. (As a side note, I am sure other kayakers have done this before, but it is not seen in the main stream. I wish I could take credit for it, but my wife Hadley was the one who put it together.) Hadley volunteered to do it for the video having never attempted it before. She said she loved it, because it was easier than climbing back up on her boat. We now call it the Hadley Combo around the Horodowich household.
If you are a paddler and you dislike climbing on the back of your kayak as your re-entry method, then this combination could work for you if you don't mind going underwater for a few seconds. You will need a pump if you use this recovery technique. In addition, using nose clips makes this a more comfortable experience. Nose clips increase breath holding, because it reduces the discomfort of water going up your nose.
As with any technique there are pros and cons. I would not recommend this technique in very cold waters unless you have a hood on your head. Also, be careful with any form of bow assists in rough conditions because the kayaks can bang into each other.
When you decide you are going to use this technique you need to communicate with your partner that you will need them to put the bow of their kayak in your hands once you are back in your kayak and you begin waving your arms. They should stay close enough so you spend little time underwater, but far enough away that their bow doesn't cause an jury on a rough day. On a calm day their bow can be right next to you.
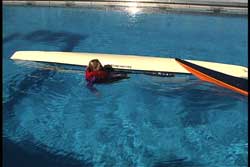
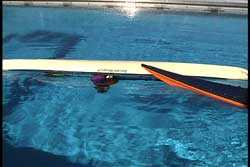
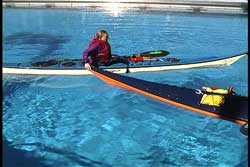
Begin next to your overturned kayak by your cockpit facing the bow. Keep your paddle between your body and the kayak so the paddle doesn't drift away.
Put both feet into the cockpit towards the bow while you rest on your PFD still looking towards the bow. As a side note, just keeping one foot in you overturned kayak is a good way to hold onto your kayak and still have your hands free to do other things.
Before you take your breath to go under, it is recommended to slide as far into the cockpit as you coaming size allows. The more of this skill you can do while breathing with your head above water, means you spend less time underwater. You are still resting back on your PFD during this time.
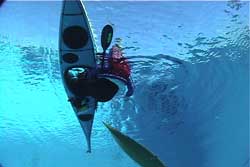
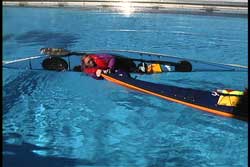
When you are ready to go underwater, take a breath and use both hands to pull yourself back into your cockpit and put your feet on the foot pedals with your knees and thighs under the braces. It is important that you are secure in your seat. Your goal is to be sitting in your kayak upside down as if you were right side up.
In order to use both hands you will have to reach underwater with the hand that was farthest away from the kayak. That outside hand is reaching so it can grab the opposite side of the cockpit coaming. The hand nearest the coaming is actually lifting the coaming and putting the kayak partially on its side, which makes it easier to grab the other side of the coaming.
This sounds a lot more dramatic than it is. Since you are almost weightless in the water getting into your kayak is not difficult. As I said, the easiest way to do this is by lifting the kayak up a little and slipping in from the side rather than going upside down to get in. My hands grab the cockpit coaming on either side so I have the leverage to pull myself into the seat.
You keep your paddle between your body and the kayak. When you grab the coaming edge closest to you be sure the paddle is between you body and your arm. This way your paddle will come up with you, as you roll yourself up, once you have your partner's bow. Some choose to hold the paddle shaft and the coaming while doing this skill.
Those who do not like water up their nose can get some nose clips and keep them attached to their PFD as white water paddlers do and use them as needed. You can also practice GENTLY exhaling through your nose while underwater to keep the water from coming in. Since you will not be under for a long time a slow exhale can do the trick.
This is a good time to express my opinion of water quality as being a contradiction of terms. In this day and age it is wise to use nose clips for any planned immersion given the pollutants in most, if not all, of our paddling waters. In this case you are intentionally going under water to get into your kayak instead of climbing out of the water to get on the deck.
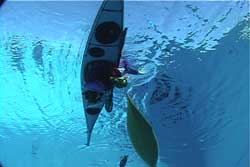
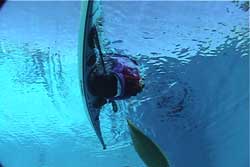
Once you are securely in the cockpit, lean forward and reach both hands into the sky. The closer your face is to the deck of your kayak the farther your hands will come out of the water. The reason you put both hands into the air is in case you get disoriented when underwater and you are not sure which side you will find your partner's bow. You may think you are reaching up the correct hand, but maybe you are not. If one hand is up on each side of your kayak your partner will have a target.
As you reach up, keep your hands away from your kayak so they do not get pinned by the on coming bow. When you reach your hands up try to keep your paddle between your arm and your kayak, if you have the awareness to do so. If not, the paddle will be close by when you finish righting yourself. Your partner can always get your paddle if it drifts away, after you are upright. You can also use the spare paddle you should have along with you (hint, hint) until you retrieve your original paddle.
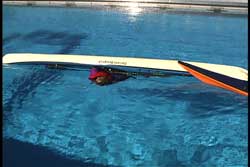
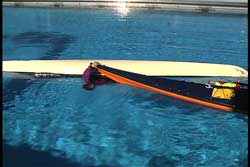
When you feel the bow in your hands I recommend you pull yourself up and rest your head on the bow and take a breath. Once you have collected your thoughts, taken some breaths and reoriented yourself, you can come up the rest of the way. With both hands on the bow flip the boat upright using your knees and legs. Then lift your head until you are upright.
See USK article, "Hip Snap."
Once upright reach for your paddle, which will be very close by. As another option, you could have given it to your partner before you started the skill. They could have tucked it away under their bungee cords, which gives you ones less thing to worry about.
When rafted up you and your partner can pump the water out of your cockpit before going on your merry way. Whether you pump with your skirt covering the cockpit opening or not will be up to the water conditions. I always find it interesting that many basic classes only teach with one person pumping during assisted recoveries. If there is a third paddler they can also come along side to help pump. It doesn't take very long to pump out a kayak that has two bulkheads if there are two or three pumping simultaneously.
As always, don't let your assisting paddler leave until you are feel you are ready to be on your own. If you need some additional support, ask your partner to stabilize your kayak as long as you need it. Be clear in your communication.
This skill can also be done with the parallel Eskimo Assist (See USK article "Eskimo Paddle Recovery"). Keep in mind that trying this variation is not recommended on those rough days. Having my head between two kayaks on a rough day is not my first choice.
If you think about the other capsize recoveries out there, the wet re-entry and Eskimo bow assist can present many other variations for some of those traditional approaches. Think about other variations for the wet re-entry in capsize recoveries.
Pictures seen above were taken from the USK Video "Capsize Recoveries and Rescue Procedures "
Updated 4-1-2011
© Copyright USK