Wet Exit
By Wayne Horodowich
A wet exit is a mandatory skill for any modern day kayaker to learn. As an instructor it is one of the first skills I teach, for many reasons. I want the students to know they can get out of the kayak when they capsize. I too want to be assured the student has demonstrated they can perform a wet exit. I have seen quite a bit of anxiety in many student's faces and in their body language, prior to doing their first wet exit. It is common for students to tell me they have a fear of being trapped in the cockpit while being underwater. Teaching the wet exit early in the class allows the students to relax for the remainder of the class and focus on learning the skills. It is rewarding to see much of the fear and anxiety disappear after the first wet exit.
There are two possible drawbacks to learning a wet exit as a first skill. First it can promote an escape from kayak attitude in some paddlers. See USK article, "Escape From Kayak Attitude." Native paddlers of the north didn't consider a wet exit as a viable option given the extreme cold waters in which they paddled. A wet exit meant possible death due to exposure so they developed other skills so they never had to get out of their kayak when they capsized. That is why I am an advocate of learning a wet entrance before a wet exit, but that skill will be a future article.
The second concern about teaching the wet exit early is the possibility of students getting cold before the class is over. However, the safety aspect of learning the wet exit first takes priority over the chill factor. I say this because the chill factor can be eliminated by having students dress properly for immersion. Depending on your particular teaching/learning environment you can adjust your sequence to allow for cold water classes. Starting classes in a heated pool is a great way to introduce students to the wet exit.
The first part of the wet exit is protecting your head from underwater obstacles. Therefore leaning as close to the front deck as your flexibility allows is important. In addition, leaning forward puts you in a better position to reach for the grab loop on your spray skirt.
This tucked forward position is of course being done while you are upside down with your head under water. For those of you who do not like water up your nose, I recommend that you very gently exhale a small amount of air out through your nose to keep the water from coming in.
As a side note, it is to your advantage to do some stretching exercises while in your cockpit. The one that would help you for the wet exit is doing a set of ten forward leans as far as you can go. When you lean forward hold that position for a few seconds then relax your position. Remember, the closer you are to your deck the farther you are away from any obstacles under the water.
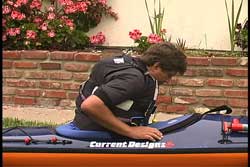
When you are upside down and leaning forward it is time to reach for your grab loop, which is usually at the front end of your cockpit coaming. I do not recommend depending upon your eyesight to find the loop. I teach all of my students to find their grab loop by feel. Since most of the grab loops are flexible it is difficult to reach directly for the end of the loop. When I lean forward I start with my free hand on the deck with my thumb on the edge of my skirt. I run my hand toward the front of the coaming to find the base of the grab loop. In doing so I can feel coaming between my thumb and index finger.
I said free hand because my other hand is holding my paddle. As you practice you will find which hand you prefer to use to release your skirt from the coaming. Whichever hand goes for the loop the other hand will hold your paddle shaft. Once I know I am going over, because I was unable to brace, I get into my set up for a roll position. That is also the position I take for a wet exit.
Learning to stay in contact with your paddle and your kayak is vital if you want to keep them from getting away from you during the wet exit process. Strong winds and currents can move your gear away from you quickly if you do not maintain contact.

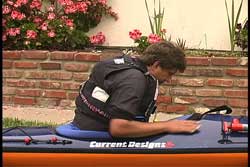
After you find your grab loop it is time to get a good grip so you can release the skirt from the coaming. My grab loop is a wide nylon strap that forms a loop. I slide all four fingers into the loop and I keep my thumb on the outside. Regardless of how your grab loop is designed it is important to have a secure grip so you hand doesn't slip off of the loop during the process.
When I began kayaking my spray skirts just had a small bit of bungee cord sticking out at the front of the skirt. I soon realized I needed a more positive grip. I saw other kayakers with small plastic golf whiffle balls tied to the end of their bungee cords. Soon I had one too.
Everyone has their own preference for how tight they want their skirt to be on their coaming. Since I did a lot of surf work I preferred a tighter skirt, because I didn't want to have the skirt imploding when hit by small to medium size waves. I suggest you find a skirt you can release within your comfort zone.
Once you have a secure grip on your grab loop you want to use your energy efficiently. Since the elastic band on the skirt is trying to hold the skirt into the groove around the coaming your goal should be stretching that elastic so it comes over the lip of the coaming. If you have a composite kayak you probably have noticed that your cockpit coaming has a sharp edge to it. Plastic coamings are more rounded and skirts tend to slip off of plastic coamings more easily.
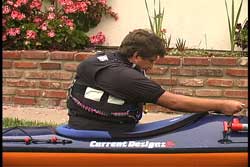
If you were to pull your grab loop straight back toward your body you could actually be keeping the skirt attached to the coaming depending on your skirt and the design of the coaming. I recommend NOT thinking of the word Pull to release your skirt. I suggest you use the following three words when removing your skirt from the coaming: grab, push and lift. You grab the loop and then push the front of the skirt away from the front lip of the coaming. Once the front of the skirt has cleared the lip of the coaming you can lift the skirt away from the coaming.
I lift my skirt by bending my arm at the elbow. Since I am lifting my grab loop toward my head, I keep my thumb folded down so I do not poke myself in the face or eye. Think of lifting the loop to the side of your ear. Right hand right ear and visa versa.
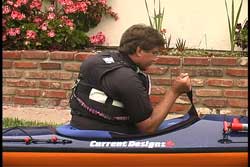
After the skirt is off of the front of the coaming you can begin pushing yourself out of your cockpit. Once the tension on the skirt is released your skirt will come off of the remainder of the coaming as you exit the cockpit.
If you try to push yourself out of the cockpit while the skirt is still completely attached you may find it extremely difficult to get out of your boat. Not only is the elastic holding your skirt to the coaming there is also a suction created by the skirt sealing the cockpit. As the skirt pulls up in unison at the tunnel the flat part of the skirt is being sucked down. By lifting the front of your skirt off of the coaming you not only release the tension of the skirt elastic, you are breaking the seal which eliminates the suction. As you come out of the cockpit water will rush in.
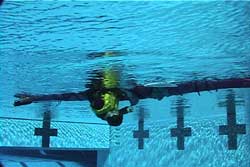
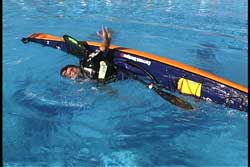
As we look at this process from an underwater perspective you can see that Todd is in the process of lifting his skirt off of the coaming. He has his skirt hand free to grab the loop to remove the skirt from the coaming. His other hand is holding the paddle, which he has parallel to the kayak.
When the skirt is removed you will begin pushing the kayak way from your body. The best analogy I have ever heard for describing the movement is like taking off a pair of jeans. When you remove your jeans you peel them down over your hips. To get out of the cockpit you are doing the same movement. You are pushing the cockpit past your hips.
In the early kayak books the movement was described as a forward roll. I have to say that image has confused many students.
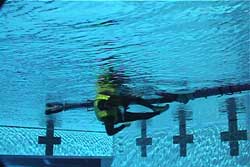
If you were to watch a wet exit from above, you will see the paddler place each hand on either side of the cockpit to push the boat past his or her hips. In this example you see the kayaker is holding his paddle in his left hand. While holding the paddle shaft the kayaker can still push on the top side the cockpit without letting go of the paddle. Since you are upside down and gravity is in your favor it doesn't take much energy to push yourself out of the cockpit.
Earlier I mentioned the escape from kayak attitude. If you were to take a moment and stay in your cockpit you could set up for a roll or bang on the bottom of your kayak, which is now in the air, to signal a nearby paddler you want to do an in-cockpit recovery. See USK articles, "Eskimo Bow Recovery" and "Eskimo Paddle Recovery." It could save a lot of time if you can perform an in-cockpit recovery instead of automatically wet exiting every time you capsize.
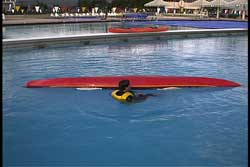
After you get your hips out of the cockpit your legs and feet will follow. I have found the greatest success by thinking of coming out of the kayak partially sideways. As I push my hips out of the cockpit my head is going toward the surface. This action starts to tilt the kayak on its side. If you look at Todd coming out of the cockpit you see that he is exiting to the side of the cockpit.
When both feet are out of the cockpit your upper body will be lifted toward the surface due to the buoyancy in your PFD, which you were wearing of course.
As your head comes to the surface you should be next to your kayak with one hand holding your paddle and the other hand holding your cockpit coaming. The first time you try this skill you may end up letting go of everything, because your first concern is to get out and to the surface. As you relax and repeat this drill you need to concentrate on holding your paddle and kayak when you wet exit.
When your head is above water and you are holding your equipment you can look around to see who is near you and decide which method of capsize recovery you will attempt.
Since I like to have my hands free whenever possible, I have adopted the leg in cockpit technique for holding my kayak after most wet exits. I face my bow and then I slip the leg closest to the kayak into the overturned kayak. I rest back on my PFD so my head stays well above the water.
I do not stick my leg in my cockpit if I am in a surf zone, rock gardens or fast moving water near rocks. I usually want my hands free when I am putting my paddle float onto my blade and inflating the float. If I am in an assisted recovery scenario, I will be pulling my kayak toward the assisting kayak as it approaches me rather than just sitting there waiting for help.
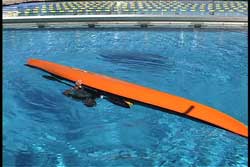
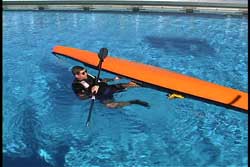
Now that we have discussed how to do a successful wet exit I am going to spend a little bit of time talking about, "What Not To Do." If you look at the photo you can see me simulating a panicked paddler who does not follow the recommended steps for performing a wet exit. Typically a panicked paddler will lean back instead of leaning forward. Then they usually try to struggle to the surface for air. By leaning back it makes it very difficult to get out of your cockpit. It also puts your hands far away from your grab loop so you cannot easily remove your spray skirt.
If we go back to the "removing jeans analogy", think about taking off your jeans while arching back like you see in the photo. In order to get your jeans and cockpit past your hips you need to lean forward. Another problem occurs when one leans back. As your backside comes off of your seat your body begins to pull the skirt away from the cockpit. Since you didn't remove any part of the skirt from the coaming, the skirt is still sealed around the coaming and lifting it away causes suction (which I mentioned earlier in the article) and the skirt holds tighter. Try this on dry land for yourself. Sit in your kayak with the skirt attached to the coaming and lift yourself off of your seat. Look at the front of your skirt suck down as you do that. Another reason for not leaning back is exposing your face to whatever is under the water around you. If you lean forward your face is protected.
Another thing Not To Do is lifting your knee to remove your skirt. For the average size paddler in a large cockpit boat it will probably not be a problem. However, I have seen the negative results of the knee lift on two occasions which has formulated my warning to you. The first was a paddler who panicked and lifted his knee to get out of his kayak. His coaming was fiberglass and his shin scraped along the inside edge of the coaming when he lifted his knee. The result was the skin of his shin being scraped away to deep tissue. The paddler ended up with an infection and a nasty scar. The second paddler got stuck in his cockpit when he lifted his knee. He was jammed inside and could not get out without help. Therefore, I do not recommend you depend upon a knee lift to remove your skirt or starting your wet exit.
Sooner or later you will forget to keep your grab loop out when you attach your skirt. This means you can find yourself upside down reaching for a grab loop that isn't where you expect to find it. It is inside the cockpit. If you find yourself in this dilemma, there is a way to get the skirt off that usually isn't difficult. Since the cockpit is an oval shape the greatest tension on the skirt is in the front and the back. This means there is less tension on the side. I tell my students to grab the skirt on the side of the coaming and lift it off of the edge of the coaming. Then you can remove the rest of the skirt. Once you have capsized with your grab loop tucked inside it is a mistake that you will probably never make again. From then on you will always check to see if your grab loop is out before attaching the front of your skirt.
There are different coaming designs and spray skirt designs that can make it easier or harder to do a wet exit. The sequence I described is a generic one that should work for any closed cockpit kayak with a spray skirt attached as long as the skirt is designed to be removed. Remember, if you want to get out of your kayak easily after you capsize, lean forward, remove your skirt and push your hips away from the cockpit and come to the surface holding your kayak and your paddle. As always, do it in a way that works best for you.
Pictures seen above were taken from the USK Video "Capsize Recoveries & Rescue Procedures"
© Copyright USK